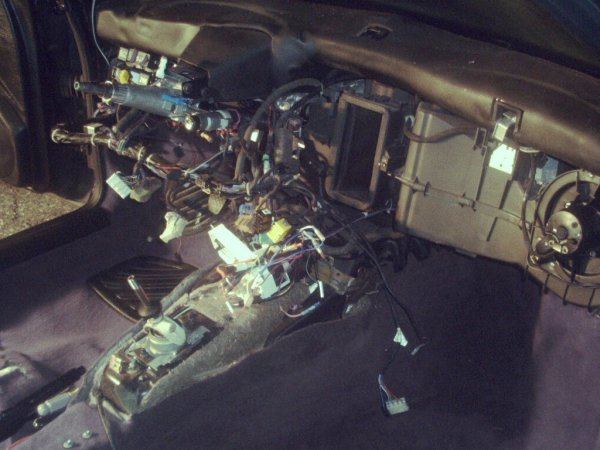
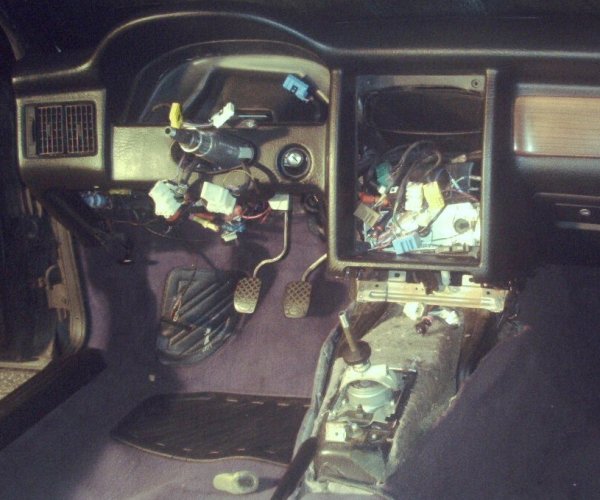
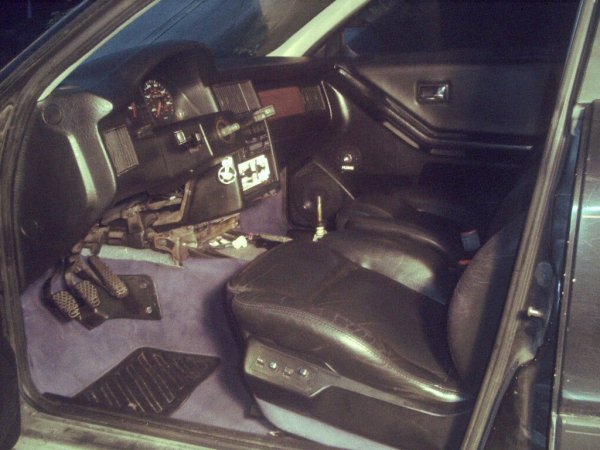
I was lucky enough to fall into most of what I needed for my interior, since our local Audi dismantler and hero Chris Semple of Force 5 Automotive was chopping the final value off a 90 with a black leather interior that was not quite worth reselling when I was there picking up some other parts. He asked me what I had in my 90 for an interior (old grey leather with a repaired driver's seat - fugly), and asked if I wanted a black leather one - all I had to do was remove it and haul it away. Two hours later I had stuffed my car with everything from the dashboard to the rear parcel shelf, the various bits of plastic trim, the carpet, and the back seats. The front seats were non-power, and my car is set up for power seats (the brackets are different), so I left them behind - there was no room for them anyway... but the next day Nate Stuart was over there and threw them in his car and brought them by. Nice to have the spare leather - thanks Nate (again...)! It was actually quite a nice interior, the scuffed and old front seats being the worst of it. The carpet was very clean and undamaged in front of the driver. So I waited while Chris kept his eyes out for a pair of black leather, heated, power front seats for an 80 or 90. Finally they came in and I went and bought them, for one of Chris' very typical good prices. Then I bought some stereo gear and built some speakers (handy when you know the guy who owns the factory!) to install while everything was out of the way, and launched into the project. Now here's the story and, later, some pictures! Most of the 90's interior is fairly easy to remove. Go here to remove the door panels. FIRST: since many electrical items will be meddled with, disconnect the battery ground wire! Rear seat bottom: undo two screws and pull out. Rear seat back: bend up two locking tabs at bottom, pop straps off them, and push up firmly. Parcel shelf: undo lower seat belt bolts so the belts can feed through, bend back locking tabs at front edge, rip out some speaker wiring and drag and pry it forward until it is free. Rear speakers (woofers): turn slightly to remove - the mount is a bayonet-style. Front seats: remove slider trim pieces by popping off screw cover at rear, unscrewing, and sliding out to rear. Power seats: pull off front covers and undo four bolts on each side. Work is easier if you run the seat to the rear and highest positions, and tilt the seat back forward as far as possible. Manual seats: undo and remove bolt at front of slide rail, and slide back out of bracket while holding lever up. Seat position can be adjusted manually for convenience as you work. Seats: carefully unplug all wires (seat belt warning, heaters, power and memory connections), and slide entire assembly out of the tracks to the rear. Working from the rear down the center: If there is a ski sack, remove its front tie point (one bolt) "Rear" console (parking brake handle area): pop out rear ashtray and undo the two bolts under it (at this point you will be using your 8 mm nutdrivers a lot more than your phillips head screwdrivers). Pop out the little trim panel at the front and undo the two screws - one hold the rear console, the other the shifter boot assembly. Do fierce battle with the handbrake cover - the leading edge of the long piece must be pried outwards to enable the locking tab on the handle to be released. Pull off handle, followed by the long cover piece. Disconnect wiring from differential lock switch and display, cigarette lighter, and rear ashtray light (if applicable). Carefully slide off over hand brake handle. "Middle" console (ashtray and shifter housing): your car may start to be very different at this point - such options as automatic transmissions, gauge packages, and climate control all alter the interelationship of these parts. What follows applies to my manual shift, gauge package, manual heater car. Unscrew the shift knob, pop out the base of the shifter boot and pull the boot off the shift lever. Pull off the heater control knobs, and undo the screws holding the heater fascia in place, to expose the two screws holding the piece of black plastic that overlays the very top of the guages. Now carefully and gently pull the console plastic rearwards, while pressing down on it a bit. As soon as the gauge fascia is free, no more downward force is required. When the clips let go and it is partly free, unplug the gauge and rear console harnesses and remove the whole assembly. "Upper" console (vents, switches, radio, and heater controls): pry out the three vent pieces. Unscrew the heater control plate. Pull all the pushbutton switches out and unplug them (their sockets are easy to reconnect, they are all color-coded). Rip out the radio, if you can, and unplug it. There are four screws an inch or so back from the face of all this stuff, that hold the upper console to the dashboard. Remove them and it will come free, if all the wiring and hardware described above is also undone properly. Driver's knee panel/cubby: four screws are all that hold this in place, although there is also a little wiring harness for pulling codes that must be unscrewed from it to completely remove it. "Glove" box: There is no need to remove this, but to do so, you undo four hex head screws and it kinda falls out. Dashboard: remove steering wheel and instrument cluster (detailed here). Pop out the two plastic covers on each end of the dashboard and undo the screws under them. Reach in where the upper console was and undo the two screws holding the air plenum to the flap box. Start pulling dashboard backwards. It will catch on a lot of things, but will slowly come out more and more. I think there are a couple of screws under the driver's side that hold a large wiring harness guide in place. On the passenger's side there is a similar, smaller harness guide for the cruise control and glovebox light wiring. Cut the zip ties that hold the wiring, pop open the guide, unplug the wires from their destinations, and bust the guide free of the "car-side" piece it comes from. Keep pulling backwards, slowly and carefully. At some point the rubber trim around the ignition switch will probably fall out one way or another. Soon the dashboard will be free of the car. Door sill covers: there is a small plastic fastener just to the rear of the B pillar to pull out, and a screw under where the back seat bottom was. With these out, a few good steady pulls here and there will snap these off the nasty metal clips that hold them in place. Try not to break the two pieces apart - they are melted together at the factory, and reinstall much better if they are still "as one." "B" pillar covers: these are pretty easy because they snap into place, but you do have to undo the lower seat belt bolt to slip the belt through the cover and remove it. It is a good idea to mark the belt setup somehow so you align it properly afterwards (i.e., no kinks while wearing). Kick panel covers: each has one hidden screw in an inch deep hole under the carpet (if they are carpeted - my grey ones weren't), and the driver's side one is also held down by the hood release cable bracket. This can be undone and left hanging, and still used, if necessary. Carpet: if you have reached this stage, there is very little to get in the way of taking out the carpet to clean it or replace it. Pull out the plaastic rear seating air diffusers to the rear. neaten up all the wiring that comes through holes in the carpet for the seats, etc. Undo the screws holding the plastic driver's right foot guard thing and remove it. Rip it out. Actually, it is really hard to get out the carpet intact, since it goes under a bunch of things we have not removed at the forward end of the tunnel. I cut my new one to obtain it neatly along the drivers side of this clutter. I ended up doing a similar cut on the passenger side to install it, since I couldn't push it under all that junk easily. These missing areas are well covered by all the console bits, though, so it's ok. Removing my old carpet, knowing I had a nice one to go in, all washed and pretty, was fun - I just hacked it and tore it until it was all gone. It tore well, since it had been wet one too many times and was a bit "delicate". While your car looks like someone's bad idea of a parts car, do whatever maintenance or installation work is now easy. I replaced a cantankerous fresh air fan and installed some nice stereo gear. My carpet underfelting was a disaster on the passengers side due to the mentioned soakings. I tore out most of the floor part, and some on the driver's side, and replaced it with crudely cut and shaped bits of 1/2" foam carpet underlay (the same stuff that is shown plugging up trunk air leaks in the stereo install file). Installation, as they say, is the reverse of removal...
|