The stock timing on the 1982 Coupe, and many other Audi/VW products, is 6 degrees BTDC. This, I believe is partly to accomplish emissions goals, and to allow the use of crummy gasoline. A cheap trick I have learned elsewhere to get a little more power from the normally aspirated 5 cylinder engine is to advance the timing. The key is to advance the timing to the peak power point. About 16-20 degrees (total) seemed to be right for me. You should have the following toys to play this game with maximum enjoyment: Timing light - one with a knob that dials in the advance is much easier to use
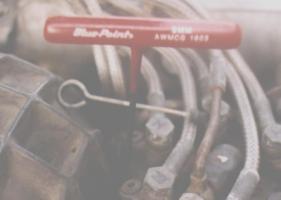
You should first check the timing as it is. I got a dial in advance timing light which is nice, you turn a knob on the end and when it is set at the actual advance, the timing mark lined up with the TDC mark. Make a note of it, you may need to return to it. Something I did while swapping the timing belt would come in real handy here - turn the engine until the "O" indicating TDC is visible and put a nice bright dab of paint on it. This makes it much easier to measure the timing. This work should be performed with the idle stabiliser unplugged, and its connectors attached directly to each other, especially when you get to adjusting the idle and mixture. It's in the glove box on my car, under the hood just ahead of the driver on others. Make a mark or something so you know the original distributor position. Loosen the nut that holds the distributor just enough to allow you to turn the thing by hand. The few degrees you nudge it to test for movement won't screw up the engine's running. Now with the timing light showing the marks, try turning the distributor counter clockwise, against the direction of rotation (figure it out from the spark plug wires and firing order) enough to say, reach 10-12 degrees advance. As you do this, the idle will change, perhaps stumbling or stalling. If it stalls you need to return the advance to it's original setting and restart the car. To keep the car idling while you do this there are two adjustments to be made. One is to turn the idle screw out (it's on the starboard side of the throttle body) a bit, the other involves adjusting the frequency valve duty cycle (FVDC). Stick with the idle adjustment if you can. If tweaking these two items lets you get up to 16-20 degrees with the car still running, then check the FVDC real quick to make sure it's reasonable. This is done with the meter connected to the two position connector that goes to nothing, usually around the starboard strut tower somewhere. The duty cycle is supposed to be around 50% at idle (which is 45 degrees dwell on a 4 cylinder setting if all you have is a dwell meter). This is adjusted by messing around in the little hole between the fuel distributor and the black rubber intake boot with the 3mm hex tool. There is a little set screw in there that adjusts the height of the air flow sensor plate arm, changing the relative mixture via the frequency valve. Clockwise for richer and lower duty cycle, CCW for leaner. You should remove the tool and rev the engine slightly before looking at the meter, to let the air plate settle in place. Do not rev the engine witht he tool in place! You can leave the distributor nut the way it is for the next step or tighten it, your choice. I leave it "adjustable loose". Now go drive up your little hill - push the car carefully (with your right foot) and listen for knocking. If you get none, you are ok, you can try advancing a little further. If there is some you have gone too far and need to back off. (Addendum... I recall that knocking never was so much an issue as beginning to lose power. Certainly it was that way with the 5kt camshaft - I drove off at 55 degrees BTDC (!), the car ran, the idle was high, the power was not so great, but it got me home. After tweaking it back to something mroe reasonable and adjusting the engine, I got it back to its peak range again.) Once you have decided you are happy with the advance, you need to recheck the duty cycle, with the idle set where you want it. Tighten everything you loosened, and put the plug back in the mixture adjustment hole if there was one. Count your tools and make sure none of them are still attached to the car (except the little hill...) I like to carry the distributor wrench and duty cycle key in case I get stuck with some bad or low octane gas, that way I can quickly pull the timing back to stock. It's never happened though. Below are photographs of some of what is described above... The white arrow points to the idle adjustment screw. It is on the outboard rear end of the intake manifold. If you remove it, there is a little O-ring which does harden, leaking unmetered air into the system. I think it is only available as a hardware store part.  The purple arrow indicates the duty cycle measurement point. Connect the common wire from your meter to the side with the brown wire going to it. The yellow arrow points to the OXS connection. Pull the black boot off the tan plastic piece to expose the male and female connectors. Leave them connected to test the functioning of the feedback loop. These are found toward the rear of the intake boot, next to the strut tower and a crusty old vacuum line... 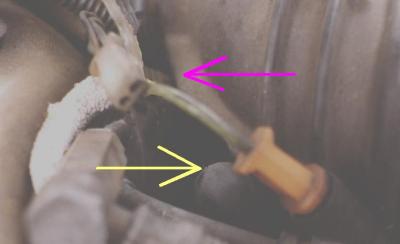 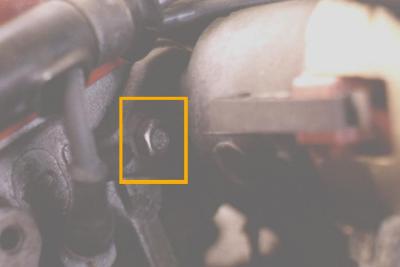 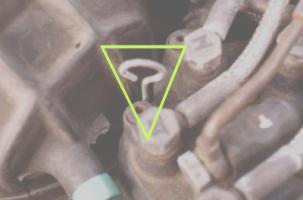
  This is the end. What, you wanted more? This was ridiculously exhaustive as it is! OK, no pix of the timing light or meter, but that would have meant another roll of film. And no photo of my knock test hill? Are you nuts too? |